![]()
Server uptime:
Uptime counter
courtesy of
Tuxtime
Thermalright SK624th April 2002 |
|
When I was building a home server, I wanted a compact cooling solution that would keep it's AMD Duron 750 processor at less than thermonuclear temperatures. Noise was also an important factor, as the server has to live in the corner of the living room, so the constant whine from a Delta 38cfm fan was not a possibility. While looking through my spares rack (okay, so it's a cardboard box!), I found a YS Tech 27cfm 60x25mm fan left over from a previous system. This would take care of the noise (not too loud) and airflow (sufficient) needs. But what heatsink would I use. While browsing Newegg's online catalog for the server's motherboard (a Shuttle MK20N) I found just what I was looking for; a copper heatsink sold without a fan. That heatsink is the Thermalright SK6, suitable for socket-A and socket 370 processors.
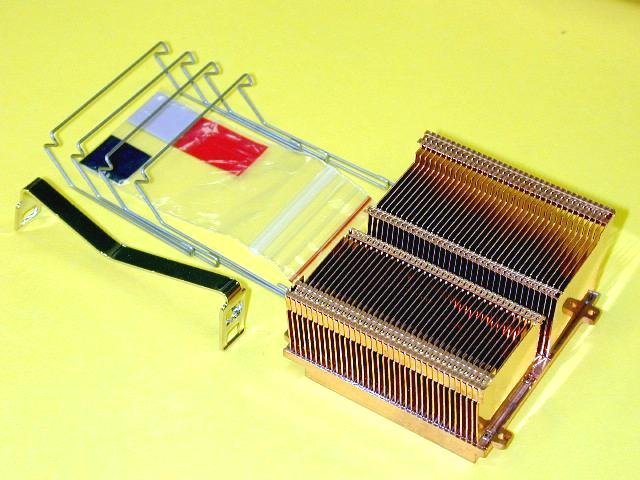
First impressions are important, and the SK6 doesn't fail to please. The cooler has a solid copper base with many thin copper fins soldered on. The fins have a kind of latch at the top corners, that keeps them linked together so the cooler will not collapse once a fan is clipped on. Overall, the heatsink is well made, although it might not stand up to much physical abuse. An important part of a heatsink assembly is the clip that holds it onto the CPU socket. It has to be able to hold the heatsink to the CPU firmly to ensure good contact, but must not apply so much pressure the CPU die is damaged. The SK6's clip seems just right (although I haven't played with many heatsinks lately); a screwdriver is needed to fit the clip, and a suitable notch is provided. Care is still needed not to slip and damage anything, but if you've enough physical dexterity to assemble your own PC, this clip should pose no problem.
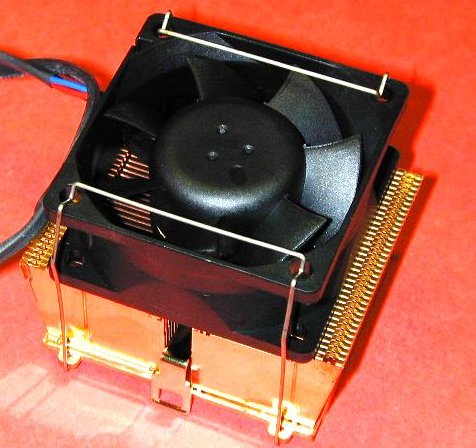
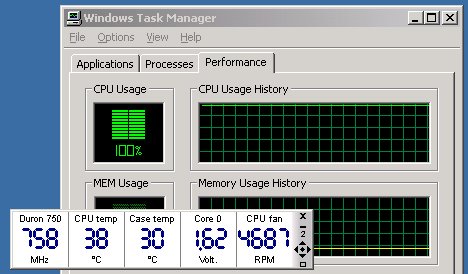
Speaking of assembly, this heatsink does require some basic assembly steps. First, trial fit the heatsink over the processor, then drop the clip into the provided slot, making sure the bend in the clip will be over the CPU core. Then fit the wire clips that hold the fan to the small holes on the sides of the heatsink. Two sizes of clip are provided; a short ones suitable for 25mm thick fans, and longer ones suitable for 38mm thich fans. Place your 60mm fan of choice on the heatsink, and lift the wire clips up and fit them into the holes on the fan. The fan isn't held completely solid, but enough to stop if falling off. Now you are ready to install the assembled cooler on your motherboard or slotket. Looks and construction are all well and good, but how does it perform?? Well, the system I bought the cooler for isn't the hottest running on the face of the planet, but an AMD Duron 750 still needs proper cooling. Installed with a YS Tech 60x25mm 27cfm fan on the afore mentioned Duron/MK20N system in a generic mid tower case with one extra 80mm exhaust fan, the processor only reaches 8-9C over case temperature at 100% CPU load running SETI@Home client. This seems to be pretty much constant, as when the case is cooler (such as first thing in the morning) the CPU is cooler, but still 8-9C over case temp. These temperatures are measured with Motherboard Monitor 5 reading the Shuttle's onboard temperature probes, so they are not the most accurate readings. By way of comparison, an AMD K6-3 450 with a Thermaltake Golden Orb cooler was always 20C hotter then the internal case temperature in the same case.
So, would I recommend this heatsink/fan combination? Absolutely. The server is sitting here, quietly humming away serving up MP3's and crunching SETI work units 24/7 without missing a beat. The bare heatsink costs $21 from Newegg, but is also available as a package with a Delta 38cfm fan for $29. If this is a bit too loud for your tastes, the YS Tech 27cfm fan I'm using is available for $10 from 1CoolPC, who also sell the bare heatsink.
|